Digital Photography and Imaging - Week 10
Week: 10 PRACTICAL: AFTER EFFECTS EXERCISE
NAME: SOFIA CHEW
I.D: 0377902
COURSE: Digital Photography and Image / Bachelor of Design (Hons) in Creative Media
GROUP: 4
.png)
Lecture
Intro To After Effect
Adobe After Effects is a 2.5D animation software widely used for animation, visual effects, and motion picture compositing in film, TV, and web videos. It excels in post-production by offering hundreds of effects to manipulate imagery, combine video and image layers, and create motion graphics by animating vector and raster art. It also supports integrating photos and video for storytelling.
Pre-compositing in Adobe Photoshop
Photoshop is used for compositing layers, which should be arranged and renamed for better organization and seamless animation in After Effects.
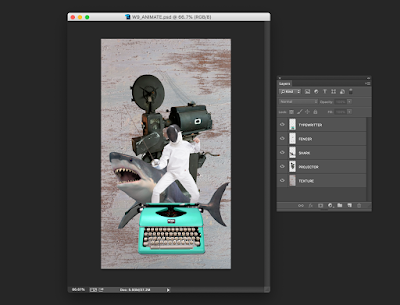
Fig 1.1 Adobe Photoshop
Pre-compositing in Adobe After Effect
In After Effects, elements like images, videos, and vectors can be imported. Layers must be organized and synced with external software like Photoshop and Illustrator. Media files are linked, not embedded, in After Effects.
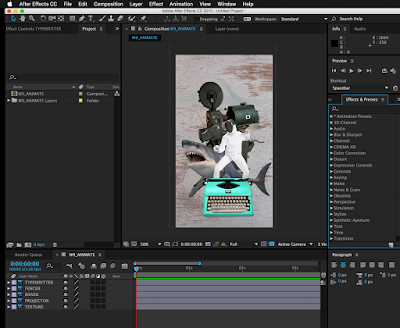
Fig 1.2 Adobe After Effects
Instruction
PRACTICAL: AFTER EFFECTS EXERCISE
This week, we were introduced to Adobe After Effects, which we will be using for an upcoming task. During our tutorial class, Mr. Fauzi provided us with an overview of the application and its basic functions. As practice, we were assigned an exercise to create motion for a digital collage to familiarize ourselves with the software.

Fig 1.4 Tutorial class recorded video
Progress
Before importing the digital collage into Adobe After Effects, I first adjusted and renamed the layers in Adobe Photoshop for better organization.

Fig 1.5 Renaming the layers
Next, I created five folders and imported the collage into Adobe AE. The animation files were organized in the composition folder, while the layer files were grouped in the PSD folder.

Fig 1.6 Organizing files
Once the organizing was complete, I began animating the first circle using the rotation effect found in the transform section. Initially, I struggled with keyframes, but after some trial and error, I became more comfortable and adjusted the motion every 2-3 seconds.

Fig 1.7 Keyframing circle movement
I then animated the next circle using the scale effect to create a zoom-in-and-out motion. Lastly, I animated the fish using the position effect to make it move around the scene.


Fig 1.8 Keyframing fish and circle movement
.png)

Comments
Post a Comment